Section 1 - Last name
The employee enters their legal last name in this box.
Use the name the employer should keep in onboarding records.
YouTube I-9 guide: employee completes Section 1 at 0:07 USCIS Section 1 instructionsUse this guide to complete the employee part of Form I-9, understand which acceptable documents you can present, and avoid filling employer-only fields by mistake. When you are ready, open the official I-9 PDF in PDFFRAME and complete Section 1 in the PDF editor.
This page is written for new employees. It explains Section 1, document choices, and which fields your employer completes. It is not legal advice or HR compliance advice. Use USCIS instructions and your employer's process for final decisions.
USCIS Form I-9, Employment Eligibility Verification, edition 01/20/25, expires 05/31/2027.
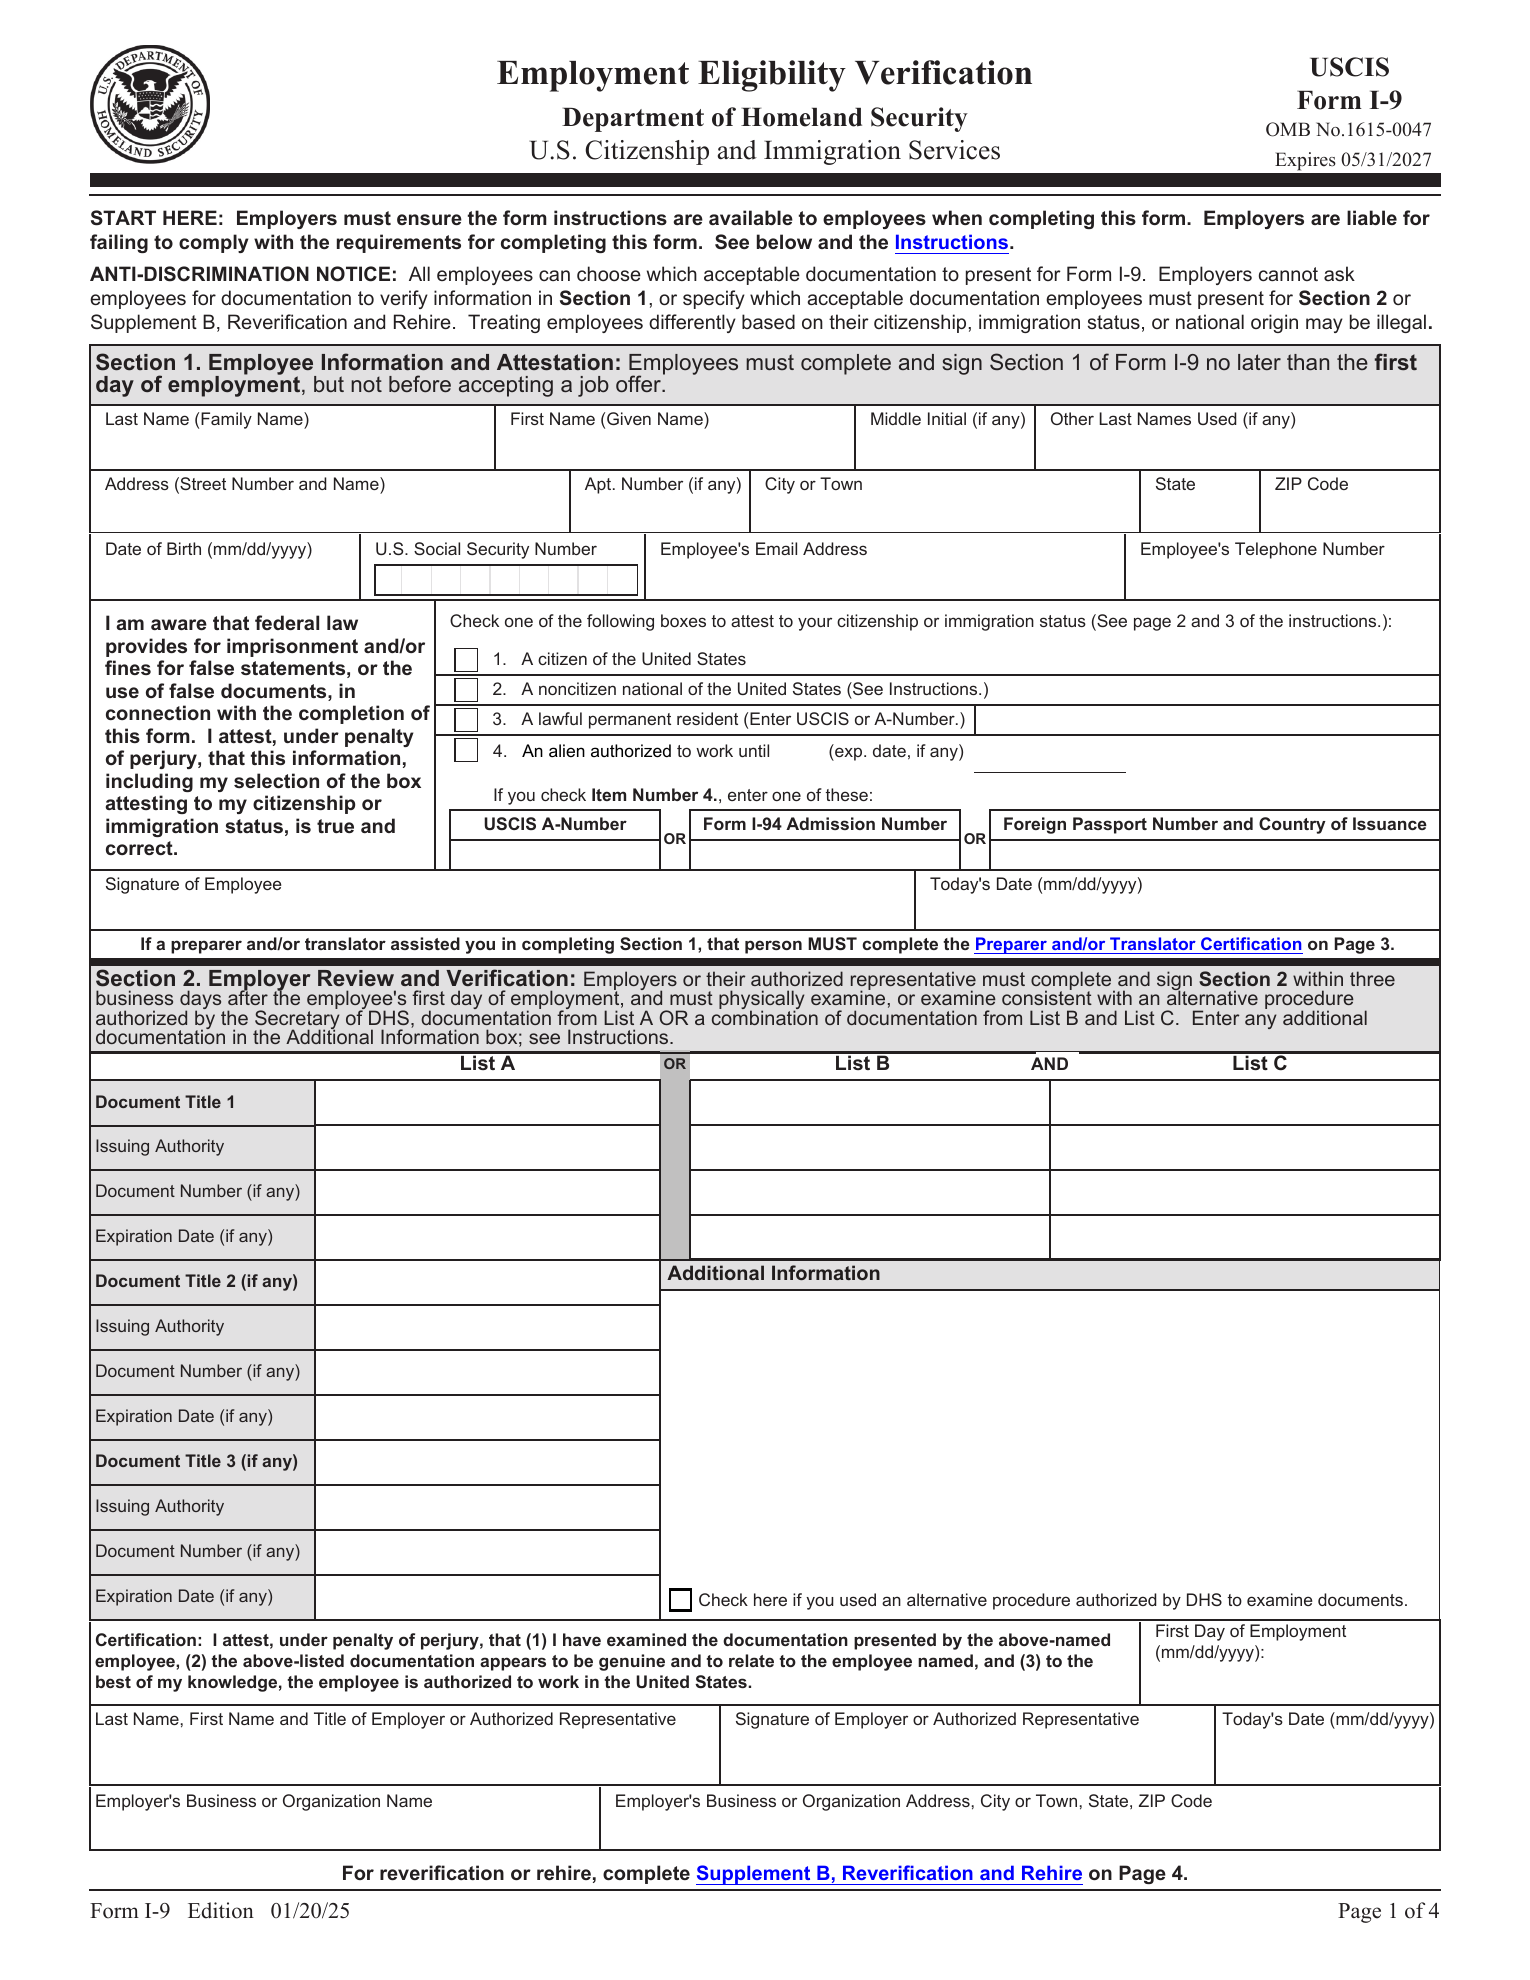
USCIS Form I-9The image below maps the main first-page areas of the current USCIS I-9 PDF. As a new employee, you complete Section 1. Section 2 is shown so you can recognize employer-only fields and avoid editing them by mistake.
The employee enters their legal last name in this box.
Use the name the employer should keep in onboarding records.
YouTube I-9 guide: employee completes Section 1 at 0:07 USCIS Section 1 instructionsThe employee enters their first or given name in this box.
Keep spelling consistent with onboarding and identity records.
USCIS Section 1 instructionsThe employee enters a middle initial if one applies.
Leave it blank only when the current USCIS form instructions allow it.
USCIS Section 1 instructionsThe employee enters other last names used, such as a former last name, when applicable.
If the field does not apply, follow the current USCIS form instructions rather than inventing an entry.
USCIS Section 1 instructionsThe employee enters street number and name in this address field.
Use a current physical address for the employee record.
USCIS Section 1 instructionsThe employee enters an apartment number if the address has one.
Do not use this field for city, state, or ZIP code.
USCIS Section 1 instructionsThe employee enters the city or town for the address above.
Keep it consistent with the street address.
USCIS Section 1 instructionsThe employee enters state and ZIP code for the address above.
Use the current address the employer should keep on file.
USCIS Section 1 instructionsThe employee enters date of birth in the format requested by the form.
Use the date of birth field only for the employee's birth date, not for any signature or hire date.
USCIS Section 1 instructionsThe employee completes the SSN field according to the form and employer process.
The video guides note that SSN handling depends on E-Verify and employer requirements. Treat this field as sensitive.
YouTube I-9 guide: SSN and E-Verify note at 1:17 USCIS Section 1 instructionsThe employee enters an email address if required or if choosing to provide it.
Follow the current USCIS form instructions and your employer's onboarding process.
YouTube I-9 guide: contact fields at 0:44 USCIS Section 1 instructionsThe employee enters a telephone number if required or if choosing to provide it.
Use a current number if your employer's process asks for one.
USCIS Section 1 instructionsCheck this only when the employee attests that they are a citizen of the United States.
Choose only the citizenship or immigration status that applies.
USCIS Section 1 instructionsCheck this only when the employee attests that they are a noncitizen national of the United States.
Use USCIS instructions if the employee is unsure which status applies.
USCIS Section 1 instructionsCheck this when the employee attests that they are a lawful permanent resident.
Complete the related USCIS number or A-number field when this status is selected.
USCIS Section 1 instructionsIf lawful permanent resident is selected, enter the USCIS number or A-number in this line.
Use the number requested by the current form and employer process.
USCIS Section 1 instructionsCheck this when the employee attests that they are authorized to work until the date entered on the form.
Complete the expiration date and one of the required number fields below when this status is selected.
USCIS Section 1 instructionsEnter the expiration date if the selected status requires it.
Use the date format requested by the form.
USCIS acceptable documentsIf item 4 applies, enter one of the requested numbers here when using the USCIS A-number option.
Do not fill multiple alternatives unless the form or employer process instructs you to.
USCIS Section 1 instructionsIf item 4 applies, enter the Form I-94 admission number here when using that option.
Use this only when it is the correct supporting number for the employee's status selection.
USCIS Section 1 instructionsIf item 4 applies, enter the foreign passport number and country of issuance when using this option.
Keep the number and country together in the designated field.
USCIS Section 1 instructionsThe employee signs Section 1 after reviewing the attestation.
USCIS says Section 1 must be completed no later than the employee's first day of employment, and not before the employee accepts a job offer.
Common question: Can Section 1 be completed before day one? Use the official USCIS timing rule above when there is any doubt.
YouTube I-9 guide: Section 1 by first day at 1:16USCIS Section 1 instructionsThe employee enters the date they signed Section 1.
Do not enter the employee's birth date in the signature date box.
YouTube I-9 guide: check the signature date at 1:43USCIS Section 1 instructionsThe employer or authorized representative reviews Section 1, then completes the employee information line at the top of Section 2.
Several video walkthroughs recommend checking Section 1 for missing fields before starting Section 2.
YouTube I-9 guide: employer completes Section 2 at 1:25USCIS Section 2 instructionsEmployer-only field: the employer records a List A document when you present one acceptable document that establishes both identity and employment authorization.
As the employee, you choose which acceptable document or document combination to present.
Common question: If an employee gives a valid List A document, do not ask for extra List B or List C documents just to be safe.
YouTube I-9 guide: List A explanation at 1:38USCIS acceptable documentsEmployer-only field: the employer records the issuing authority for the List A document reviewed.
Do not type in this employer field unless your employer specifically instructs you to.
USCIS acceptable documentsEmployer-only field: the employer records the document number for the List A document reviewed.
Your role is to present acceptable documentation through your employer's process.
USCIS acceptable documentsEmployer-only field: the employer records the expiration date if the List A document has one.
All documents containing an expiration date must be unexpired unless USCIS rules treat an extension as unexpired.
USCIS acceptable documentsEmployer-only field: the employer records the List B identity document when you present List B plus List C instead of List A.
A driver's license is a common List B example in the video walkthroughs, but you may choose any acceptable document combination.
Common question: Employers can share the full acceptable-documents list, but should not tell the employee exactly which documents to bring.
YouTube I-9 guide: driver's license and Social Security card example at 3:07USCIS acceptable documentsEmployer-only fields: the employer records the issuing authority, document number, and expiration date for the List B document reviewed.
These details come from the document reviewed by the employer or authorized representative.
USCIS acceptable documentsEmployer-only field: the employer records the List C employment authorization document when you present List B plus List C.
List C is paired with List B when no List A document is used.
YouTube I-9 guide: List B plus List C option at 1:48USCIS acceptable documentsEmployer-only fields: the employer records the issuing authority, document number, and expiration date rows for the List C document reviewed.
These fields are completed only when a List C document is used with a List B document.
USCIS acceptable documentsEmployer-only field: this row is used only when the selected List A documentation requires a second related document entry.
As the employee, do not fill document 2 just because the row is visible.
USCIS acceptable documentsEmployer-only field: the employer records the issuing authority for List A document 2 when that row applies.
This information comes from the document reviewed by the employer or authorized representative.
USCIS Section 2 instructionsEmployer-only field: the employer records the document number for List A document 2 when that row applies.
Do not type in this employer field unless your employer specifically instructs you to.
USCIS acceptable documentsEmployer-only field: the employer records the expiration date for List A document 2 if the document has one.
USCIS acceptable document rules control whether an expired or extended document can be accepted.
USCIS acceptable documentsEmployer-only field: this row is used only when the selected List A documentation requires a third related document entry.
Many I-9 completions leave document 3 blank.
USCIS acceptable documentsEmployer-only field: the employer records the issuing authority for List A document 3 when that row applies.
Use the current USCIS instructions if you are unsure whether the extra row is needed.
USCIS Section 2 instructionsEmployer-only field: the employer records the document number for List A document 3 when that row applies.
Do not duplicate document numbers across rows unless the current instructions call for it.
USCIS acceptable documentsEmployer-only field: the employer records the expiration date for List A document 3 if the document has one.
Leave it blank when the row does not apply.
USCIS acceptable documentsThe employer uses this box for additional information when the current USCIS instructions or employer procedure calls for it.
Leave it blank when there is no additional information to record.
USCIS Section 2 instructionsEmployer-only field: the employer checks this only if an alternative procedure authorized by DHS was used to examine documents.
Do not check it as a new employee.
USCIS Section 2 instructionsThe employer enters the employee's first day of employment in the certification area.
USCIS says Section 2 is generally completed within three business days after the first day of employment.
Common question: The date entered here should be the actual first day of employment, not the day Section 2 is signed unless those dates are the same.
USCIS Section 2 instructionsYouTube I-9 guide: Section 2 within three business days at 2:30Employer-only field: the employer or authorized representative enters their name and title here.
This is not the new employee's name field.
USCIS Section 2 instructionsThe employer or authorized representative signs after examining the employee's documentation and completing Section 2.
The newest valid video guide emphasizes that photocopies, digital files, or pictures are not acceptable for ordinary document review unless an authorized alternative procedure applies.
Common question: Is a scanned document enough? For ordinary review, align the answer with USCIS document-examination rules and any authorized alternative procedure.
USCIS Section 2 instructionsYouTube I-9 guide: original document review at 1:57Employer-only field: the employer or authorized representative enters the date they sign Section 2.
This is not the employee's Section 1 signature date.
USCIS Section 2 instructionsThe employer enters the business or organization name in this field.
Use the employer's business information, not the employee's name.
USCIS Section 2 instructionsThe employer enters the business or organization address, city or town, state, and ZIP code in this field.
Use the employer's business address, not the employee's home address.
USCIS Section 2 instructionsSection 1 is the employee side of Form I-9. The employee enters personal information, selects citizenship or immigration status, and signs the attestation. If a preparer or translator helps, Supplement A is used.
Enter name, address, date of birth, and contact fields according to the current form. Review spelling before signing.
Choose the status that applies. Lawful permanent residents and noncitizens authorized to work may need to provide additional information.
Sign and date Section 1 after the information is complete. Do not use your birth date as the signature date.
Section 2 is not the new employee's filling task. Your employer or authorized representative reviews your acceptable documents, records document information, enters your first day of employment, and signs the employer certification.
Bring or provide acceptable documents through your employer's process. The employer records the document details in Section 2.
You may present either one List A document, or one List B document plus one List C document. Your employer should not require a specific document if another acceptable option is allowed.
The employer or authorized representative completes the certification area, including signature, date, employer name, and employer address.
As a new employee, you choose which acceptable documents to present. The short version is simple: List A proves both identity and work authorization; List B proves identity; List C proves work authorization.
Present one acceptable List A document if it covers both identity and employment authorization, such as a qualifying passport document.
Present one acceptable List B document for identity when you are also presenting one List C document. A driver's license is a common example in the video walkthroughs, but the current USCIS list controls what is acceptable.
Present one acceptable List C document for employment authorization when you are also presenting one List B document and no List A document is used.
The current Form I-9 uses supplements for specific situations. Do not fill them just because they are in the PDF.
Use Supplement A when a preparer or translator assists the employee with Section 1.
YouTube I-9 guide: preparer or translator certification at 1:15New employees usually do not complete Supplement B. It is used by the employer for reverification, rehire, or a legal name change when applicable.
YouTube I-9 guide: Supplement B uses at 4:17If reverification is required, the employee may present an acceptable document that shows continued authorization to work.
YouTube I-9 guide: reverification document choice at 4:47PDFFRAME opens the regular PDF editor, so you can add text, checkmarks, signature, and date to Section 1 of the official I-9 PDF or your employer's copy.
You complete Section 1. Your employer or authorized representative completes Section 2 after reviewing acceptable documents.
USCIS allows Section 1 after accepting a job offer and no later than the first day of employment. Do not complete it before accepting the offer.
No. The employee chooses which acceptable document or document combination to present from the USCIS list.
No. Section 2 is for the employer or authorized representative. It records document review and employer certification details.
The video guides and USCIS document review workflow emphasize original document review for ordinary I-9 completion unless a specific authorized alternative applies.
The preparer or translator completes Supplement A for Section 1 assistance.
No. This guide explains the PDF workflow and field locations. Use USCIS instructions, your employer, or a qualified professional for compliance questions.
Use this online PDF editor to manage PDF documents in your browser.
This document is processed locally. Your file is not uploaded anywhere.
This document is processed locally. Your file is not uploaded anywhere.
Waiting for PDF upload
Upload a PDF to start editing.
PNG or JPG signature images are supported.
Signature
Use these nearby workflows when an onboarding PDF needs filling, signing, or compression.